Friday, 17 May 2013

Under the Sea (do do do do!)

This month, we've dived deep under the sea to explore the world underwater! It's been a wonderful unit, and the only problem I've had is there is just too much to pick from! As usual, we started out by doing some KWL charts, so I gauge their knowledge and interests. I also invited the kids to bring in any books or sea creatures they have to share with the class. We created this lovely little display for everyone to see: 

We started off by learning about the 5 different oceans, and the different type of habitats that are in them (simplified as Rock Pools, Reefs, Wide open Ocean, and the Deep and Dark). I found this great book at Costco Oceans: A Journey from the surface to Sea Floor.  I printed off a map of the planet, and then we labeled the oceans colored in where examples of each habitats were. I got this great book at Costco that opened up and had little scenes from each that was just awesome!

The next thing we studied were Coral Reefs, talking about how they are like forests and why all the different animals choose to live there. All the tables in the room made their own mural, and where each student was given a different creature from the reef. They colored and cut them out, and I called over all the kids doing one animal at a time and taught them a few facts about the one they had. They then went back to their tables and taught the other kids what they had just learned! Here is our mural:


 Our next project was Jellyfish! In a lovely coincidence our letter of the week was "J", so we completed a journal activity using all sorts of "J" words to describe jellyfish. The next day we made this great craft inspired by Pinterest, with a bit of modification. We used a paper bowl covered in tissue paper for the body, and then fishing wire, streamers and ribbons to make the squiggly tentacles. They looked great hanging up around the room!

We then moved on to the big giants of the sea:  Sharks, whales and Narwhal (the last one was specifically requested!). We made these adorable Sharks, and inside each of their mouths (red paper plates - haha!) is an interesting fact about sharks, that the students then shared with each other.

After learning about Sharks and Whales, we then completed a Venn Diagram comparing and contrasting the two. It was great to see how much they learned about both!
For Narwhals, we watched this short video off of National Geographic-  Wild Detectives: Narwhals and completed a Fact Sheet about them. We learned that Narwhals are about 6 kindergarteners long (7 meters), by laying down head to toe in a line. They really loved the annoying  Narwhal Son, that went viral on the internet last year. I found a clean version, and then had it stuck in my head for the next three days!

Lastly we learned about Sea Turtles. We read a book about how baby turtles are born, and wrote in our journals about how they bury their eggs in holes in the sand and hatch at night to avoid getting eaten! We then made these Wax Resistance Water Colour Turtles that just turned out amazing! I drew the outline of the shell for them, and they added the details including drawing different line patterns in each section of the shell. When we painted them, half the students did the shell while the others did the sea and then switched paints. This helped to keep the different colored sections from bleeding into each other, and gave me time to sprinkle sea salt on the ocean part to give it the look of bubbles. I am so proud of how great these look up in the hall!


Thursday, 16 May 2013

Community Helpers!

In April, we spent the month learning all about the different people who help in our community. It was a great way to introduce the little ones to different jobs that everyone does to keep our town a safe and fun place to live. We did several "behind the scenes" field trips during the unit to local businesses to really give them a chance to understand what "grown-ups" do at their jobs.We visited Walmart, a local hotel and grocery store, and will be going to fire-hall and library next week!

We started out the unit by brainstorming an A to Z poster of all the community helpers we could think of - some letters were a lot harder than others, but I was pretty amazed by some of the answers they came up with. My personal favorite was Y for "Yoga Instructor"!


We then spent a day learning all about firemen and fire saftey! We practiced "Stop, Drop and Roll!", counted all the fire extinguishers and alarms in our school, and even had a fire-drill in the snow!  We then made a list of everything Firemen Can, Have and Are, and made some fireman puppets! Then I read out a list of firesafety tips and everytime it was a good idea they made their puppet "jump for joy!"

We also read the book Flat Stanley and created our own versions.  Then over Spring Break I sent home a letter asking parents to take Stanley to their work, and take some picture and write a little blurb about their jobs. It was a great way for them to share more about Mom and Dad with our class!

As the last part of our unit, and as part of school wide initiative, we've been doing Random Acts of Kindness around our community. To begin with, we baked some cookies together and made some lovely cards. I then took them and dropped them off at our Police Station, Veterinarian and Hospital. I've heard feed back that they were very appreciated! 

We also made some cards (with a little treat!) for our buddy class and put some of our favorite artwork up in the staffroom to brighten it up!


Friday, 26 April 2013

Dinosaurs On Parade!

I teach in a town where there is a huge Dinosaur Museum, and they are a really Big THING. As such, I've got a lot of kids who are REALLY in to them. So last November, we spent a month learning all about the Dinos! FYI: Brontosaurus no longer exists, and dinosaur names can be ridiculously hard to pronounce. It's even better when you're corrected by a 5 year-old on said pronunciation.


We started out by creating a "Dinosaur" Alphabet. I used this activity on PBS from the show Dinosaur train. We watched the above video, and then made our own alphabet in which I took the pictures from the website and drew them bigger on a piece of paper (with the help of my lovely sister!) . Each student colored in a page, and then we got to that letter in the song, they had to lift their page above their heads. I first put them up on the board and I later made it into a dinosaur book for our classroom!
 

At the time we were working on patterns. I have a kit of small different colored plastic dinosaurs ao I then took some home and took some pictures to make up some pattern cards: 

They then used the actual dinosaur manipulatives to complete the patterns and then went on to create some of their own. I used this as one of variety of centers that also included matching dinosaur models to molds, a color word activity and some great dinosaur puzzles supplied by my EA.

I found this great activity on a blog somewhere but I can't for the life of me remember where I got it! I found some rough estimates of the size of some dinosaur's feet and then made a life size model out of construction paper and laminated them. We then measured them using our shoes! They took them off (with lots of giggles about stinky feet!) and we recorded how many fit on each feet. It gave them a great idea of relative size. We also all laid down head to toe and we were about the same length as a T-Rex!


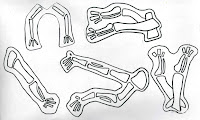
Another one of my favorite activities that we did during this unit was an art project in which we created our own dinosaur skeletons. As drawing the bones or bodies would be a little too hard for some of the little ones in November, I drew a few different dinosaur skeletons (T-Rex, Stegosaurus, Triceratops, Pterodactyl and Apatosaurus). I then cut them up by tails, bodies, front legs, arms/back legs, necks and heads. I then photocopied enough that each table could have a variety of bones to choose from (each part had to be from a different dino) . They then cut them out, and arranged them to look like a dinosaur on some black construction paper. After they glued them down I helped them come up with some names for their dinosaurs (some of which were hilarious)! Here are the bone pages I made and the final products:


             Rib Cages                                          Back Legs
                 Front Legs                                             Necks


                     Tails                                                Heads


Tuesday, 16 April 2013

The Penguin Plunge!


Back in January, my class spent the month learning all about one of my favorite animals, Penguins! The kids were really into it as well. And one of the great things about penguins is all the awesome resources and books out there on the subject!

To start out our unit, I did some pre-assessment to determine what my students already knew and what they would like to learn. We began by doing a "Can, Have, Are" chart. The students told me what they knew about penguins  and I wrote it on a post-it note (correct or not - quite a few of them thought penguins might be fish!).  Then we decided if that was something penguins did, have or are. At the end of the unit, we went back and had a look to see if our ideas about penguins were right.
Our class spent time learning about 5 different types of penguins : Rockhopper, Emperor, Chinstrap, Fairy and African. We did a variety of activities on these species. We used life-size posters to learn about how big they are and compared their sizes using snap cubes to place them in order from biggest to smallest!  The Emperor was almost the same size as some of them and they all loved the cute Little Blue/Fairy Penguin best!


We then looked at the globe and learned about where penguins live and a bit about maps. My sister had bought a bucket of mini-happy feet penguin figures and they worked perfect (with a bit of tweaking to make them fit our species)! I had a flat map of the world, and the students helped me place the figures where those species lived. They then completed a worksheet where they glued pictures of our 5 types onto a map. It helped familiarize them with continents and the southern hemisphere especially.


I found a series of books about "Tacky the Penguin" by Helen Lester. There was even a great App for some of the books thru the Apple Store! After we read about Tacky (who is a very odd bird) we created our own "tacky" penguins, whose sweaters had drawings of things that were special about them. They also created an pattern on the scarf around their penguins neck! We hit a bunch of outcomes with this one. I traced the large penguin outline for the kids on black construction paper, and then photocopied the white part. It took us about 2 afternoons to complete.

We also did this GREAT experiment found on Pinterest, in which children learn how penguins stay warm in the cold cold water. We talked particularly about Emperor penguins, and how they have both blubber and that their feathers create a water proof layer. First they dunked their fingers in "naked" in some ice water and counted how long they could keep it in. Then they tried with Vaseline to act as blubber, and finally a rubber finger cover over both to simulate feathers. It was amazing how much longer the two allowed them to keep their fingers in!

As January can be a long and boring month, I made sure we had some other fun art projects to do to brighten up our days as well. We used plasticine to make these adorable penguin sculptures - all made by making simple shapes and sticking them together. They even made little "ice floats" for their penguins to sit on in the display. It was also interesting to see how different they all turned out!


We also did some finger painting to make these "landscape" paintings, which we also used to take about the weather in the antarctic and what it would be like to live in winter all the time. The trick to this activity was to start with the black and to have lots of wet-naps for them to wipe their fingers off on!

On the last day, we had a "Penguin Party"and watched Happy Feet (and yelling out when we saw a penguin species we knew!) and made "sushi" out of fruit roll ups, Rice Krispy squares (the pre-made ones), red licorice and Swedish fish candy. The kids simply roll out the fruit roll up, squish the Rice Krispy out to cover it, and then place the licorice in the middle. You then roll it up and cut it into three pieces and then they place the fish on top. It was a big HIT!


Wednesday, 20 March 2013

Saint Patrick's Day Breakfast

On Friday we celebrated St. Patrick's Day in our classroom by having Breakfast together! The day before we made these cute and easy hats (found on pinterest): 


We wore them while we ate our yummy themed breakfast, which included Lucky Charms with green milk as well as variety of green fruit including limes -it was awesome watching them make sour faces as they tried them! After breakfast, we coloured and cut-out the following Leprechaun Template (made using the Paper Dolls cartridge from Cricut): 
After that, we took our Leprechauns on a walk around the classroom and school and took pictures of them "hiding" in different places. When we got back to the classroom, I printed off the pictures and each student completed the following the page, which we then turned into a class book! 
 

Saturday, 16 March 2013

Fairy Tale Madness!


During March, our classroom theme has been Fairy Tales and it has been just magical! 

To begin the unit, we read some Fairy Tales and discussed what is it that makes a story a Fairy Tale. We decided that Fairy Tales have six themes in common. We then made these paddles so that whenever we read a story the students can raise them in the air when they are able to identify any of the elements. I found this was a great way to keep students engaged during story time and recall important details about a story.


We read one of my favorite books The Balloon Tree by Phoebe Gilman and then created our own Balloon Trees using pre-cut strips of brown construction paper and finger paint. The students first arranged and glued the brown paper strips into whatever shape of tree they wanted, and then used red, blue and yellow finger paint to create the balloons, including mixing the primary colors to create secondary ones.


 They had a lot of fun using their fingers to mix the colors
                                      

One of my favorite parts of this project is how each tree turned out  different, just like a real forest

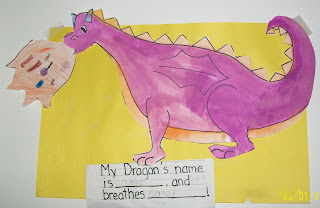
For our next activity, we read the classic The Paper Bag Princess by Robert Munsch. We used watercolors to paint our dragons in our favorite colors, and then after they had dried we cut them out.  We also wrote a short description about our dragons where the students chose a name for their dragon, and what they breathed instead of fire (because a fire breathing dragon is scary!). As our letter of the week was "C", both of their choices had to start with that sound. My personal favorite was Carl the Crab-breathing dragon. 


This activity took us a few days to compete, but the final project was well worth it.


We also spent a week reading The Three Little Pigs. I found a great package over at Pre-K Pages that basically got me through the week.
Three Little Pigs Fairy Tale Activities for Preschool and Kindergarten

We finished this "mini-unit" on Friday by doing a simple Reader's Theatre of the story in which each student played a special role in our "production" including being set designers (we created the houses using bristol board and construction paper), costume designers (who made the masks) and then some of the more advanced readers learned the script with me and acted it out. It was super fun and successful, and they keep on asking me when we can "be movie makers again!"

The masks that we used can be found here. The students colored and cut them out, and the mounted them on cardboard headbands. I also have a very simple script I created that we used, and if you would like a copy, drop me an email and I'll send it to you!